Vibration casting 101
I assume you have previous experience with casting or at least a "working knowledge" of the process.
What you’ll need:
-A scrap board
-A motor
-An offset weight that can be mounted on the motor
-A power source for the motor
-Foamcore board
-Tape (duct or electrical)
-Spray paint (White)
-Plain paper and medium CA glue or large shipping labels
-A computer and printer
-Wood stand- offs
-Petroleum jelly (Optional)
-A casting mold
-Polyester casting resin and MEKP
-Mixing cups and stir sticks
-A thin scrap board and 2 long screws (Optional)
-A dental pick or tooth picks
-Hot glue gun and glue
-Brass pen tubes
-Standard tools everyone should have (Exacto knife, tape measure, clamps, ext.)
First, you need to build a vibrating “table”. Take a scrap 2x4 or any scrap board for that matter that’s around 18 or 24” long and spiral some hot glue on one side. Let the glue cool.
While the glue cools, mount an offset weight on a motor. I use a long bolt and a collet like thing to create the vibration.
Now that the glue has cooled, mount the motor on one end of the board. You can use tape, but a better way is to screw a thin board into the 2x4 holding the motor in place.
Now use foamcore to build a box around your mold. This must have a base larger than the mold. This is what we will use to hold the mold on the table. Tape this box on your vibrating table.
Now we get to the fun part: Tube preparation. First, paint the tubes. I use white for labels.
While the paint dries, print your label on either a large shipping label or plain paper.
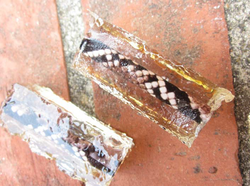
Cut the label to just a bit wider than the tube and apply a line of medium CA on one of the longer edges. Set the tube in the line of glue.
Now finish gluing the paper onto the tube. Use more glue around the edge but you don’t need as much in the middle. Let the glue set then trim the excess paper on the ends.
Next, glue standoffs. I don’t use weights but rather use stand offs that just fit in the mold.
Now I coat the stand offs with petroleum jelly.
The next step is to put the tubes in tour mold and CLAMP THE VIBRATING TABLE DOWN. This is very important unless you want your PR all over the floor.
It’s time to grab the resin. I use castin’ craft clear PR.
Pour enough resin to fill your mold into a cup and mix in MEKP. I use 3 drops per ounce of resin.
To remove any bubbles you stirred into the resin, hold the cup on the vibrating table with the motor turned on.
It’s (finally) time to pour. Pinch the cup to make a pour spout and pour a thin line of resin into the mold.
Turn on the motor to start the vibration stage. Using a dental pick, start to move the larger bubbles away from the tube with the motor still running.
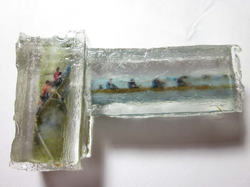
That’s it! I move my molds out into the sun to cure. I hope this will help some of you trying to cast bubble free labels. This is a step closer bubble free, but for that you really need a pressure pot. Now go to your local electronics store, grab a motor, and get to work!
What you’ll need:
-A scrap board
-A motor
-An offset weight that can be mounted on the motor
-A power source for the motor
-Foamcore board
-Tape (duct or electrical)
-Spray paint (White)
-Plain paper and medium CA glue or large shipping labels
-A computer and printer
-Wood stand- offs
-Petroleum jelly (Optional)
-A casting mold
-Polyester casting resin and MEKP
-Mixing cups and stir sticks
-A thin scrap board and 2 long screws (Optional)
-A dental pick or tooth picks
-Hot glue gun and glue
-Brass pen tubes
-Standard tools everyone should have (Exacto knife, tape measure, clamps, ext.)
First, you need to build a vibrating “table”. Take a scrap 2x4 or any scrap board for that matter that’s around 18 or 24” long and spiral some hot glue on one side. Let the glue cool.
While the glue cools, mount an offset weight on a motor. I use a long bolt and a collet like thing to create the vibration.
Now that the glue has cooled, mount the motor on one end of the board. You can use tape, but a better way is to screw a thin board into the 2x4 holding the motor in place.
Now use foamcore to build a box around your mold. This must have a base larger than the mold. This is what we will use to hold the mold on the table. Tape this box on your vibrating table.
Now we get to the fun part: Tube preparation. First, paint the tubes. I use white for labels.
While the paint dries, print your label on either a large shipping label or plain paper.
Cut the label to just a bit wider than the tube and apply a line of medium CA on one of the longer edges. Set the tube in the line of glue.
Now finish gluing the paper onto the tube. Use more glue around the edge but you don’t need as much in the middle. Let the glue set then trim the excess paper on the ends.
Next, glue standoffs. I don’t use weights but rather use stand offs that just fit in the mold.
Now I coat the stand offs with petroleum jelly.
The next step is to put the tubes in tour mold and CLAMP THE VIBRATING TABLE DOWN. This is very important unless you want your PR all over the floor.
It’s time to grab the resin. I use castin’ craft clear PR.
Pour enough resin to fill your mold into a cup and mix in MEKP. I use 3 drops per ounce of resin.
To remove any bubbles you stirred into the resin, hold the cup on the vibrating table with the motor turned on.
It’s (finally) time to pour. Pinch the cup to make a pour spout and pour a thin line of resin into the mold.
Turn on the motor to start the vibration stage. Using a dental pick, start to move the larger bubbles away from the tube with the motor still running.
That’s it! I move my molds out into the sun to cure. I hope this will help some of you trying to cast bubble free labels. This is a step closer bubble free, but for that you really need a pressure pot. Now go to your local electronics store, grab a motor, and get to work!